Tag Archives: OBDexpress.co.uk

How does TIS2000 & TDS SPS view the files on Corvette C6?

This article starts with a question “I have a Corvette C6 Grand sport from 2011 with AT6. I read an article that new software has been programmed into the automatic gearbox in the 2012 Corvette C6, making the switching times (with the flippers) much faster. I also heard that there are updates for the LS3 engine”.

Method one: use TIS2000

You don’t need a subscription to view the files on your own car .

You run the TIS2000 in the virtual PC and connect to your car and can read the files in your car.

It’s only when your need to update your car you need the subscription .

If you enter your VIN here you can view the latest files available for your car and compare it with what TIS2000 shows and see if your files are updated or not

Method 2: Use TDS SPS instead of TIS2000

GM TIS2000 can be set up to pull the latest firmware files, but is not for the novice to set it up this way since it meant more for abroad dealers that don’t have the best of internet services to use TDS instead.

So your best bet is to just use TDS to update the firmware instead. Its only $40 for TDS for 2 years per vin.

As for using TDS SPS with the Vxdiag nano GM, once you load the TDS software with Java , your going to get this pop up, and you don’t want to load these drivers, but use the Nano driver that will already be loaded on your machine.

So when you get this window pop up in SPS each time you load the program, just skip loading these drivers each time.

is2000-tds-sps-view-the-files-on-corvette-c6-01

And on the next screen, it will be this driver that you use for the Nano (will be pre loaded on the machine from when you installed VX Driver MDI beforehand).

is2000-tds-sps-view-the-files-on-corvette-c6-02

 Enjoy

http://blog.obdexpress.co.uk/2019/08/27/tis2000-tds-sps-view-files-on-corvette-c6/

How-to’s of VXDIAG VCX NANO GM + TIS2000 works?

Topic: How to use VXDIAG VCX NANO GM work with TIS2000

ok for anyone trying to use the VXDIAG GM nano with SPS this is what you need to do (order is important):

*** please note you cannot use the VM that the VXDIAG package comes with (GDS2 VM). It’s configured in such a way it won’t work with the dongle crack and caused me a lot of head scratching to find this out.

1. Create a windows XP 32bit VM using VMWare Player

2. Make sure you add an LPT port (set to auto, not connected on startup). It doesn’t matter if your actual PC has an LPT port or not this is needed for the dongle crack later.

3. Install VMWare tools for your VM

  1. After you have the windows VM up and running install the BOSH MDI drivers here:

(the MDI drivers on the driver disk and vxmanager installer wouldn’t install on my xp 32bit VM but the one from bosh does)

5.From the driver disk or from allscanner.com install the VXDIAG MDI package with pass thru driver (VXDIAG MDI manager or VXDIAG Manager)

Download tis_data_1.iso, tis_data_2.iso, GM-NAO-TIS200-3_2008.iso, TIS2000DongleCrack.rar from this: http://auto-professionals.co/?dl=5847273d53a0b0635724a7b3e1626ef7  (password: mhhauto) or you can purchase one TIS2000 crack

  1. (files / instructions in the updated.txt you may need to click the link more than once if you get an error when downloading)
    7. Mount the tis_data_1.iso in your VM (use the virtual cdrom in vmware player and attach to iso file) this will start the auto install of the TIS2000 2007.3 software)
    8. All options can be installed using the default selections however make sure you check the install checkbox above the parallel security device on the one screen.
    9. After installation is complete you can extract the TIS2000DongleCrack.rar and copy the folder to the desktop of your VM
    10. Go into the TIS2000DongleCrack folder locate the drivers folder and open it, run the DDINST32.EXE (if you get a registry error you didn’t install an LPT port in your VM), select Express and it should install the files then click ok / Exit to close.
    11. Go back to the main TIS2000DongleCrack folder and copy SCAControlUI.exe and Id.dll to c:\Program Files\cosids\bin\ (it will prompt to replace id.dll select yes).
    12. Go back to the main TIS2000DongleCrack folder into the Dongle folder and copy the 2 files in there to c:\windows\system32\ (the dongle crack is now installed)
    13. Now mount the tis_data_2.iso in your VM (use the virtual cdrom in vmware player and attach to iso file) and open TIS2000 (double click the icon on your desktop) when TIS opens it will ask you if you want to upgrade click yes.
    14. After the upgrade completes mount the GM-NAO-TIS200-3_2008.iso in your VM (use the virtual cdrom in vmware player and attach to iso file) and open TIS2000 (double click the icon on your desktop) when TIS opens it will ask you if you want to upgrade click yes.
    15. After the upgrade completes you have successfully installed TIS2000 2008.3 and the Dongle crack, now we need to configure TIS to use the VXDIAG GM nano
    16. Open TIS2000 from the icon on your desktop, select Configuration menu from the top and select IO Management.
    17. Click the Driver button, click the Browse button, locate the j2534.dll file in the window and click open (installs the J2534 Pass Thru Driver)
    18. Now click the Add button (in IO management) enter exacly “Generic Pass Thru” in Logical Name and select “J2534 Pass Thru Driver” in the Driver drop down, click OK.
    19. Select Generic Pass Thru in the list and click Properties, in the Device Name drop down select VXDIAG, (ALLScanner) and click ok then click close to close IO Management.Now TIS2000 software is installed and configured all you have to do is connect your VXDIAG device to the PC / VM. To do this first use a usb and connect it to the PC then in the VMWare player menu go in removable devices and connect the Future Devices USB to serial converter. At this step my windows install didn’t have the basic usb to serial drivers so I connected the VM to the network (if not connected use the VMWare player menu to connect the network) and windows downloaded them from the net and installed the device as com3. you are now good to go.At this point you can now click on SPS in TIS2000 select Generic Pass Thru as your device and your good to program!!Satisfied, VXDIAG VCX NANO GM device works as a clone to the GM MDI.

    Credits to wizzardsl writing for the how-to’s for us.

How to solve “GDS2 Days Remaining Until Lease Expires 1”

Purpose:How to solve GM MDI GDS2 software “Days Remaining Until Lease Expires 1” and “GM MDI software is out of date”.

Here you are:

Part 1: Solution to “GM MDI software is out of date”

If any of the GM MDI (item no. SP163, SP163-CSP163-DSP163-E) got the error ” GM MDI software is out of date”.

GLObalTISmdi recovery-01

Follow the 5 steps to do:

  1. Hold on the start button, ready to connect the power supply.

GLObalTISmdi recovery-02

  1. Hold on this button, connect the power supply, the power light on, wait for 10 seconds.

GLObalTISmdi recovery-3

  1. When all the lights turn on, release the button and the machine enters the recovery state.

GLObalTISmdi recovery-0

  1. Connect the USB cable to the computer, ready to recover.

GLObalTISmdi recovery-05

  1. Open GM MDI Manager and choose “Recover”

Done.

Part 2: Solution to GM MDI GDS2 software “Days Remaining Until Lease Expires 1”

Actually, GM MDI already fixed the bug that GDS2 software displayed “Days Remaining Until Lease Expires 1”, that means the newest GM MDI won’t have this error any more.

Now:

gm-mdi-gds2-software-activation-01

Before:

gm-mdi-gds2-software-activation-02

In the paste, GM MDI user can follow the next steps to fix the problem.

There is a icon on the software desktop, open this icon to follow the operation guide, it will tell how to adjust the time.

They way to activate GM MDI GDS2 software:

  1. Reset computer time/date

1) Run “lease time” in the computer’s start menu, if GDS2 is pre-installed

gm-mdi-gds2-software-activation-03

gm-mdi-gds2-software-activation-04

2) Click on “Stop ALGM Service”, change data and time in “Date” and “Time” column. Make sure the date and time are correctly set.

3) Check and confirm the “Leasetime” is completely consistent with the computer system time, if not same, please change your PC date and time.

gm-mdi-gds2-software-activation-05

4) Select the date and time of the time zone (Your local exact time ).

gm-mdi-gds2-software-activation-06

2.Activate GM MDI GDS2 software

1) Connect your computer with network, browse to:

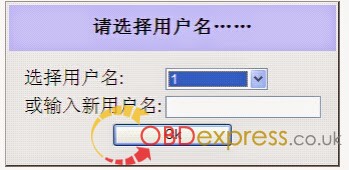
2) Select user account, then click on “ok”.

gm-mdi-gds2-software-activation-07

3) Press “Continue”

gm-mdi-gds2-software-activation-08

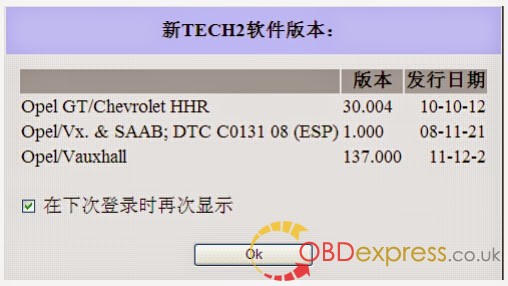
4) Click on “OK” button when the system display new Tech2 version.

gm-mdi-gds2-software-activation-09

5) Click on “OK”.

gm-mdi-gds2-software-activation-010

6) Select “GDS2” Tab and then press on Run GDS2 button.

gm-mdi-gds2-software-activation-11

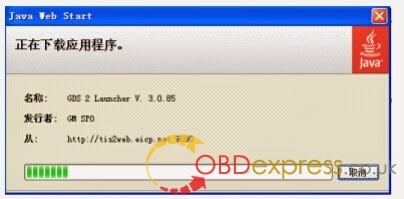
7) The system will install JAVA software automatically.

gm-mdi-gds2-software-activation-12

8) After installing the JAVA, the system will automatically lease renewal.

9) After lease renewal, start MDI GDS software, the system will display the new lease the remaining days in the lower-left corner of software program.

Thanks.

Please enjoy.

How to use Lonsdor to read pin code from Citroen xsara if key is not adapted?

Question is: can vvdi found pin code from Citroen xsara if key is not adapted to this car(new transponder) ??

The answer is:

No. Working key required.
If the bcm/bsi whatever is NEC based then it’s soldering job. If later model then maybe Lonsdor able to read via OBD
The best way if you read it from the ECU.

necpic

Feedback:

ok thanks, usually I take pin from ecu, but in this old have old sagem ecu with rouber inside so its not possible to do on this ecu, i will try from bsi.

Advice:

Be careful with the bsi. Most of them are water damaged craps (the cable from the engine bay is providing some water into the bsi) with badly aged cables and connectors. It could be a nightmare…

Lonsdor K518S reads pin code for Citroen Jumpy 2018

lonsdor-k518-renault-jumpy-1

lonsdor-k518-renault-jumpy-2

lonsdor-k518-renault-jumpy-3

lonsdor-k518-renault-jumpy-4

lonsdor-k518-renault-jumpy-5

lonsdor-k518-renault-jumpy-6

Lonsdor K518S reads pin code Peugeot 407 2007: Succeed.

lonsdor-k518-peugeot-407-7

lonsdor-k518-peugeot-407-8

lonsdor-k518-peugeot-407-9

lonsdor-k518-peugeot-407-10

Source:http://blog.obdexpress.co.uk/2019/07/24/can-vvdi-find-pin-code-from-citroen-xsara/

Where to buy a cheapest Autel MaxiCOM MK908P?

Where to have Autel MaxiCOM MK908P, Amazon, Ebay or one B2C website like obdexpress.co.uk. I would like to give my objective advice based on my web search and personal experience.

  1. Who is cheapest?

1). Autel MaxiCOM MK908P price on amazon:

2.351,99 € , 2.369,99 € , 2.399,99 €

autel-mk908p-amazon-01 autel-mk908p-amazon-02

2). Autel MaxiCOM MK908P price on Ebay

EUR 2.599, EUR 2.399, EUR 2.199,99 etc.

autel-mk908p-ebay-03

autel-mk908p-ebay-04

3) Autel MaxiCOM MK908P price on obdexpress.co.uk

€2,090.00

Source: http://www.obdexpress.co.uk/wholesale/autel-maxicom-mk908p.html

Autel MaxiCOM MK908P

  1. If I bought from obdexpress, can I have language reset?

The answer is yes, after receive MaxiCOM MK908P, only supply with the serial number, you will have one-time language reset service for free.

MaxiCOM MK908P language available:

English, Spanish, French, German, Polish, Italian, Japanese, Korean, Dutch, Portuguese, Turkish, Swedish, Thai, Arabic, Russian

3.Does it have any limitation to use MaxiCOM MK908P?

The answer is NO. No matter who you are and where are you from, you can use MaxiCOM MK908P freely.

  1. How long does MaxiCOM MK908P offer free update online?

It is one-year free update online.

After one year, the update cost is 1135EURO/1000GBP.

  1. Autel MaxiCOM MK908P Warranty

one year’s guarantee

  1. Autel MaxiCOM MK908P after-sales service

Don’t need to worry about the Autel After-sales service.

http://www.obdexpress.co.uk is always here for service.

Autel MaxiCOM MK908P feedbacks will be more helpful.:

http://blog.obdexpress.co.uk/2019/07/09/autel-maxicom-mk908p-program-ecu-key-works/ 

VXDIAG VCX SE : BMW ICOM cheap alternative

VXDIAG VCX SE must be the cheap alternative of BMW ICOM. The price of VXDIAG VCX SE is one third of ICOM Next, but it has as the same capabilities and features and ICOM. Both has the capabilities of All BMW E, F, G Series diagnosis, programming & coding. VCX SE features in online programming, LSAT parts drawnings, brush hiding etc.

First come the full package of VXDIAG VCX SE:

One vcx SE unit of good quality with one 16pin port , one USB cable, one CD, one box and one extra 500GB HDD.

The CD is contained with the driver, if you have the original BMW software, please run the driver first.

If you don’t have the original BMW software, just run the packed 500GB HDD, plug it into the computer and it will run smoothly.

vxdiag-vcx-se-1

From: http://www.obdexpress.co.uk/wholesale/vxdiag-vcx-se-bmw-programming-coding.html

Next is to connect VXDIAG VCX SE to the computer and BMW vehicle.

The connection is easy to do, Wifi connection and Bluetooth connection is allowed.

1). With the original BMW software, insert the CD to run the driver first, then run BMW software.

2). Without the original BMW software, insert the HDD to the computer to directly run without installation.

vxdiag-vcx-se-2vxdiag-vcx-se-3

VXDIAG VCX SE coverage:

Generally speaking, from 2004 to 2019 incl. BMW Cars, for BMW Motorcycle, for Rolls-Royce, for Mini Cooper.

Followed with BMW diagnostics and programming operation:

  1. ISTA -D (Diagnosis)

vxdiag-vcx-se-0401

Input VIN.

vxdiag-vcx-se-4

Click on “Vehicle Test”, and it directs you to Control unit tree and control unit list.

vxdiag-vcx-se-5

Click on “Activities” -> “Guided troubleshooting” -> “Fault memory”.

vxdiag-vcx-se-6

Operation information -> Operation details.

vxdiag-vcx-se-7

  1. ISTA -P (Programming)

VCX SE has many engineering software options incl.

WINKFP (for E series: programming, upgrade and downgrade)

Tool32 (enter key, import codes, delete certification, advanced features of For BMW series)

INPA (read vehicle information, diagnosis, read and clear trouble codes)

For BMW Coding (for E series: import data, change the code or realize hidden functions)

KSD2 (offer full vehicle repairing information for diagnosis or programming)

NCS-Expert tool (for E series: set codes, realize hidden functions and change settings).

It is worth mentioning that VCX SE has the capabilities of many programming options:

– ECU upgrade programming, coding, Change vehicle configuration VO, Import vehicle FSC activation code.

-Import /Export Data Software.

– ECU version upgrade /downgrade, ECU repair after ISSS programming failure.

– Vehicle diagnosis, delete fault code, read vehicle Data.

– Matching control unit sets code, changes vehicle configuration and activation code, deletes hidden function.

– Flash programming of control unit.

– Manual input parameter reading module, reset fault software/ hardware number.

-Brush hiding function, circuit parts drawing query, accessories query, etc.

Seeing is believing, here comes one VCX SE test video:

Youtube video is coming.

Thanks.

VXDIAG VCX SE for sale:

http://www.obdexpress.co.uk/wholesale/vxdiag-vcx-se-bmw-programming-coding.html


Source:http://blog.obdexpress.co.uk/2019/07/18/vxdiag-vcx-se-bmw-icom-cheap-alternative/

Benz 211 DTS diagnostic & programming (CBF) with Mercedes Benz C6

How does Benz C6 diagnose and program 211 DTS Monaco?

Video demo:

Benz 211 DTS Monaco diagnostic & programming (CBF) using Vxdiag Benz C6 step by step.

benz-211-dts-diagnostic-programming-benz-c6-01

  1. Open “DTS Monaco”, click on “Yes, I am”.

benz-211-dts-diagnostic-programming-benz-c6-02

  1. Initializing DTS Base System…

benz-211-dts-diagnostic-programming-benz-c6-03

  1. Click on “Open a workspace”.

Select 211, then open.

benz-211-dts-diagnostic-programming-benz-c6-04benz-211-dts-diagnostic-programming-benz-c6-05benz-211-dts-diagnostic-programming-benz-c6-06benz-211-dts-diagnostic-programming-benz-c6-07benz-211-dts-diagnostic-programming-benz-c6-08

  1. Click on “Start”, wait until finished.

benz-211-dts-diagnostic-programming-benz-c6-09benz-211-dts-diagnostic-programming-benz-c6-10benz-211-dts-diagnostic-programming-benz-c6-11

  1. Click on “Flash Programming”, then “ME97 (HSCAN_KW2C3PE_500). M272_KE_VC13_2”.

benz-211-dts-diagnostic-programming-benz-c6-12

  1. Click on ” Temporarily add flash data”, select “Benz (C:) -> DTSProjects-> _ALL_CFF -> ME97 -> 0064475240_001.CFF.

benz-211-dts-diagnostic-programming-benz-c6-13benz-211-dts-diagnostic-programming-benz-c6-14

  1. Tick off Session control for ME97…

Click on “Stop”.

benz-211-dts-diagnostic-programming-benz-c6-15benz-211-dts-diagnostic-programming-benz-c6-16

  1. Select “ME97 (HSCAN_KW2C3PE_500). M272_KE_VC13_2”, then “Read ID”.

ECU Origin…Value OK

Supplier Identification (Name /code) …Value OK

Diagnostic information …Value OK

Hardware version (Major /Minor) …Value OK

Software version (High / Middle / Low) …Value OK

Part number …Value OK

benz-211-dts-diagnostic-programming-benz-c6-17benz-211-dts-diagnostic-programming-benz-c6-18

  1. Exit DTS Monaco workspace.

Mercedes Benz C6 by VXDIAG is really nice to perform Benz 211 DTS diagnostic & programming (CBF).

Source:http://blog.obdexpress.co.uk/2019/07/17/how-does-benz-c6-diagnose-and-program-211-dts-monaco/

SD Creation Guide for Kess V2 & K-Tag (5.017 & 7.020)

Trying to use a kess v2 2.47 clone to read an ecu of tmax 2007 and when I click on its protocol I get the error ““Invalid protocol file”.

sd-creation-guide-for-kess-v2-k-tag-01sd-creation-guide-for-kess-v2-k-tag-02

Possible reason:

You have maybe bad protocol file for this ECU on SD card.

Solution:

SD image needs to be created for CID Number SD-card.

Follow the below guide to creation SD card for Kess and Ktag:

 SD Creation Guide for Kess V2 & K-Tag (5.017 & 7.020):

Tools / Software that you will need:

  • Winhex (full version is recommended)
  • Xorfiles
  • win32diskimager

The files I used to do my Kess SD Card, where made / shared by Svvag2000 (Give a Big Thanks to him) and you can search online for this tutorial / files (Guide to creation SD card for Kess and Ktag):

  • Kess_5.017 (decrypted SD Image for Kess 5.017)
  • KTag_7.020 (decrypted SD Image for KTag 7.020)
  • KeyFileGenerator.cmd (Script to generate KeyFile needed)

You can review this video Svvag200 made for help on the procedures:

https://www.youtube.com/watch?v=sE2xVdhSFew

#1: Insert your SD Card in the Card Reader, and Open WinHex

#2: Hit F9 and Select the SD Card / Drive Letter:

sd-creation-guide-for-kess-v2-k-tag-03

#3: Select “Edit – Select All”

sd-creation-guide-for-kess-v2-k-tag-04

#4: Select “Edit – Fill Block”, and make sure value is “00” – Hit OK

sd-creation-guide-for-kess-v2-k-tag-05

Depending on your SD Card Size and reader/system, this might take a while. (my 16Gb Kingston took 30min. so, grab a few beers )

#5: After this is done, you need to remove the SD Card, and put in the device (Kess / KTag), connect to the computer and open KSuite.

Note: If you get the error “External exception EEFFACE”, don’t freak-out. I also had it. Just try several times, connect / disconnect tool from computer or try to leave the tool connected for some minutes, and them open again K-Suite. (I also had to try more than 10times with one of my cards)

Some say the protocols, should be “greyed out”, but in my case they where normal. When I tried to “open” the protocol it just gave me the “No Protocol Found” warning.

After this is done, disconnect the tool from computer and remove SD Card.

#6: Insert SD Card into the Computer, and Open again in WinHex (same as point #2)

#7: Select “Edit – Define Block” – End (Write the blocks we need to select and hit “OK”)

sd-creation-guide-for-kess-v2-k-tag-06

These are the Blocks Value: 000000D0 – 0000019F

#8: Select “Edit – Copy Block – Into New File” (a window will pop out for you to save this new file in the desired location)

sd-creation-guide-for-kess-v2-k-tag-07

Give the file name: “Key” and save it.

sd-creation-guide-for-kess-v2-k-tag-08

#9: Then we need to run the script / batch file “KeyFileGenerator.cmd”

sd-creation-guide-for-kess-v2-k-tag-09

Note: The “Key” file we generated, must be in the same location as the script/batch file.

Some files will be created, but we just need the “KeyFile.bin”, and it should have 127,139,792 bytes.

#10: We format the SD Card in FAT / FAT32 (I don’t think you guys need help on this one)

sd-creation-guide-for-kess-v2-k-tag-10

#11: We copy the content of the folder “Kess_5.017” (decrypted SD Image for Kess 5.017) to the SD Card.

sd-creation-guide-for-kess-v2-k-tag-11

#12: Then, we open again the SD Card in WinHex (same as #2)

#13: Then we do the same as #3 and #8 (Select All & Copy Block Into New File)

sd-creation-guide-for-kess-v2-k-tag-12

Note: Now, assuming your SD is bigger than ±122mb, we need to “cut” the image file we just made.

#14: Open in WinHex, the Image we just created (if you didn’t close, it might be already open in WinHex) and repeat the same operation as #7 & #8, but this time with this block sizes: 0-793FFFF

sd-creation-guide-for-kess-v2-k-tag-13sd-creation-guide-for-kess-v2-k-tag-14

This is the file we need to use combined with the “Key” file we made in #9. The file should have 127,139,792 bytes

#15: Now we open “XorFiles.exe” and select the files by this order:

FileName 1: KeyFile.bin (Created in #9)

FileName 2: Decrypt_SD.img (Created in #14)

FileName 3: This is the File we Need for our “New SD Card” – Give the Name and Location you like.

sd-creation-guide-for-kess-v2-k-tag-15

#16: New we just need to “Write” our Image file in the New SD Card.

Open and select the drive you want to “write”, select the Image File and hit “Write”:

sd-creation-guide-for-kess-v2-k-tag-16

After this is done, you can put the Sd Card in the Tool, and your all set…

(Finally, you can have some more beers )

NOTE: I´m not the author of any of the information shared in this file. I just put this together to make life easier to other people that might be finding hard to have this SD Card made.

All Credits must go to the Author of these Files (Svvag200), and at least to “pocinas” that made me clear point #14.

I hope this works for you guys… Cheers to All…

Big thanks to @ boxsport (DK forum member).

Last edited by Laurance on July 11, 2019.

www.obdexpress.co.uk
Source:http://blog.obdexpress.co.uk/2019/07/12/sd-creation-guide-for-kess-v2-k-tag/

ISTA+, ISTA/D and ISTA/P Differences and Requirements

Friendly Reminder for those Requesting Software (ISTA+, ISTA/D and ISTA/P) – See Differences and Requirements.

E-Series & R05x Mini:

Interface = K+DCAN Cable (OBDII to USB) or ICOM

ECU Data Files = SP-Daten

NCS Expert = Coding Software

WinKFP = Programming (Flashing) Software

EDIABAS = Low Level ECU Communication Software used by NCS Expert & WinKFP


Fxx- / Ixx- / Gxx-Series, Mini (F05x/F06x), & Rolls-Royce:

Interface = ENET Cable (OBDII to RJ45 Ethernet) or ICOM

ECU Data Files = PSdZData

E-Sys = Coding Software

E-Sys = Programming (Flashing) Software


ICOM BMW:

ICOM A: main interface

ICOM B: adapter for programming multimedia in E series

ICOM C: adapter for old BMW with round 20 pin diagnostic plug

ICOM D: adapter for motorcycles


Additional Dealership Level Software

  1. ISTA+ (AKA Rheingold or ISTA-D)

DIAGNOSTICS for All Vehicles

PROGRAMMING for F/I/G/RR & MINI, but requires an ICOM

All Requests, should be directed Here

Additional Details: Beginner’s Guide to BMW ISTA+


  1. ISTA-P

PROGRAMMING traditionally for all chassis, but F-/I-/G-series phased out with 3.63.5 release (March 2018).

ICOM Recommended. An ICOM emulator with K+DCAN or ENET can be used, but will NOT communicate over all protocols to program every ECU.

Replacement ECU’s must be NEW

MINIMUM REQUIREMENTS:

Windows 7-10 Computer

ISTA+: 22 GB Installation + > 2 GB free space to run (Diagnostics Only).

Additional 70 GB SDP & ICOM to program (Excludes E-series)

ISTA-P: 112 GB Installation

At least a processor with 2 cores and 2.2 GHz

At least 4 GB RAM

http://blog.obdexpress.co.uk/2019/07/10/ista-ista-d-and-ista-p-differences-and-requirements/

Autel MaxiCom MK908p Reviews: program ECU /key works

I’m extremely impressed with this Autel MaxiCom MK908p scan tool after a few weeks of use. The interface is intuitive and navigation is quite easy. The touchscreen is incredibly the largest I’ve ever purchased and is very responsive. I can scroll without having to resort to pushing buttons. The layout of PIDs and graphing capabilities are amazing. The PID descriptions are actually understandable. I have not seen a slew of cryptic abbreviations for any of the PIDs.

I’ve been really happy with the bi-directional capabilities. I’ve used it mostly on Fords, however, I believe Autel MK908P hits the ball out of the park and it will have useful by-directional controls for all makes.

It’s super easy to update, more like using an Android tabletone-click update via Wi-Fi is enough to get the latest version of diagnostic software with more vehicle coverage and bug fixes.

Came with a J2534 ECU programming device, very professional for BMW and Benz. Capable of replacing the existing software in the ECU, programming new ECUs and fixing the software-controlled drivability issues. An advanced ECU diagnostic tool.

And it allows you to do a whole lot more than scan the car and diagnose problems. For instance, you can reprogram keys as long as you get the key code. It is also able to reset many systems, from check engine light to ABS. Should you want to reprogram certain ECU settings, you are able to do so; however, this feature is only available for certain models. Above all, I guess these are the reasons why it claims to be a perfect scan tool for auto shops and professional technicians.

Out of the Snapon , Mac, and Matco scan tools I have, this one is by far the most versatile and complete.

Autel MaxiCom MK908P is the best one after MaxiSYS Elite, MaxiSYS MS908P, MaxiSYS MS908it has advanced configuration (hexa-core Processor, 64GB memory, 10.1M LCD etc) as well as full-system full-brand diagnosis, ECU programming /coding etc.

Comparison: Autel MaxiCom MK908p, MaxiSYS MS908P, MaxiSYS MS908, MaxiSys Elite
Product Autel MaxiCom MK908P Autel MaxiSYS Elite Autel MaxiSYS MS908P Autel MaxiSYS MS908
Image MaxiCOM MK908P-01 autel-maxisys-elite-new-02 autel-maxisys-pro-ms908p-diagnostic-tool-03 autel-maxisys-ms908-maxisys-diagnostic-system-04

 
Price 2090EUR 2916EUR 2313EUR 1759EUR
CPU Samsung Exynos hexa-core Processor NVIDIA Tegra 4-PaLUS-1 Quad-core Processor 1.8 Samsung Exynos Quad-core Processor 1.4 GHz Samsung Exynos Quad-core Processor 1.4 GHz
IOS AndroidTM 4.4.2 KitKat Android 4.4.4 Kitkat Android 4.0 ICS Android 4.0 ICS
Memory 64GB 32G 32G 32G
Touch Screen 10.1M 1920×1200 Retina LCD 9.7″ 2048×1536 Retina LCD 9.7″ 1024×768 LED Capacitive 9.7″ 1024×768 LED Capacitive
VCI Connectivity USB2.0/WLAN/BT USB3.0/USB2.0/WLAN/BT USB2.0/WLAN/BT USB2.0/WLAN/BT
Wi-Fi 2.4 GHz 2.4 & 5 GHz 2.4 & 5 GHz 2.4 & 5 GHz
Internal Battery 15000 mAh 3.8V Lithium-polymer Battery 15400 mAh 3.7 V Lithium-polymer Battery 11000 mAh 3.7 V Lithium-polymer Battery 11000 mAh 3.7 V Lithium-polymer Battery
Weight (Display) 3.26 lb. (1.48kg) 3.5 lb. (1.59 kg) 3.121b. (1.42 kg) 3.12 lb. (1.42 kg)
Camera (Rear) 8.0 Megapixel, AF with Flashlight 8.0 Megapixel, AF with Flashlight 5.0 Megapixel, AF with Flashlight 5.0 Megapixel, AF with Flashlight
Wireless VCI MaxiFlash Elite MaxiFlash Elite MaxiFlash Elite Wireless Diagnostic Interface
Oscilloscope (Add-on)
Inspection Camera (Add-on)
Complete OEM-Specific
Scanner Coverage
Auto VIN Technology
Maxifix Cloud Based
Info System
Shop Manager
ECU Coding Advanced Advanced Advanced Advanced
ECU Flash Programming Optional w/MaxiFlash Kit
1996-2001 Connector Kit
MaxiFlash Elite
Diagnostic coverage Passenger Vehicle &

Light Duty Truck

Passenger Vehicle &

Light Duty Truck

Passenger Vehicle &

Light Duty Truck

Passenger Vehicle &

Light Duty Truck

Autel car list, search the model you like to do:

https://pro.auteltech.com/measurecarApp-1-1.html?m=94&operatorType=1

Enjoy.

Source:

http://blog.obdexpress.co.uk/2019/07/09/autel-maxicom-mk908p-program-ecu-key-works/